I participated in the icon battle (1 icon per episode) hosted by ![[personal profile]](https://www.dreamwidth.org/img/silk/identity/user.png) tinny; 4 rounds, all of which are still ongoing. Originally, I was going to sit on this post until round 1 of the battle was due, but since teaotter posted theirs already, I decided I might as well – additional promotion of the icon battle! Here's my offering for Round 1 (one icon per episode, episodes 1-10), in compilation image format:
tinny; 4 rounds, all of which are still ongoing. Originally, I was going to sit on this post until round 1 of the battle was due, but since teaotter posted theirs already, I decided I might as well – additional promotion of the icon battle! Here's my offering for Round 1 (one icon per episode, episodes 1-10), in compilation image format:

I gave in to my urge to tl;dr about what I did; if you just want the pretty pictures, click here.
Note that all my prior-to-this icons were just screencaps that were edited with brightness-contrast etc if necessary (or perhaps a logo/subtitling/inauspicious sleeves or windows meticulously removed), with the end goal being something that looked exactly like a screencap. Now, however, I took the plunge of being Creative with icons, and armed with the luminosity mask tutorial and prior experience with layer masks (ah, my misspent youth making terrible graphics for online horse breeding simulators, you finally become useful), I set to work.


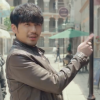
For episode 1, I knew exactly what cap I wanted to use, and how I wanted to use it, so I went and played with luminosity masked layers until I got the desired result. (One of the nice bits of luminosity masks is that I could just take the one that let shadows through and fill it with back to get the dramatic shadows I wanted.) Then I added the text 黑袍教授 ("Professor Black Robe") onto it, because this is the first time Shen Wei goes Envoy in Professor clothes. Of note is that I had to basically quadruple the 黑袍 textlayer to make it stand out with the same intensity as the 教授 text layer.


Once I was done being all dramatic for ep 1, I went to episode 2 and did something much less dramatic. I did some layer duplication and layer masking so that I had fully-colored Shen Wei and Zhao Yunlan on their own layer, and then a desaturated everything else. The greys were too warm-looking, so I added some #9cb7bc with an Overlay layer (IIRC) at low opacity to make it cooler. #9cb7bc is my favorite image editing color. It's so useful! (It's also the color of the text in the Thus Spake Ye Zun collection!)


Episode 3, I saw this cap of mine and wanted to make a "woman is menaced by unseen thing behind her" icon. I played with the color levels etc, and added some texture behind her with GIMP's native tools (fog, lava), and ended up with a bleh icon that was completely different to what I wanted to do. I later came acrossalwaysbeenasmiler's Hades textures, added the fourth one on the second row into the background, and found myself with an excellent "woman walks away from explosion" icon! I was very satisfied by my texture find.


For episode 4's icon, a post bytinny came up, in which gradient mapping was mentioned, so I of course had to try it! This one has a bunch of layers at various opacities, plus layer masks; Zhao Yunlan is partially gradient mapped into a sepia-esque gradient, and the background is sepia'd up.


I was going through my episode 5 caps when I noticed I had one of Shen Wei taking off his glasses, so I decided to pander totrobadora and use that as a base. Settling in for the long haul, I duplicated the base layer (I always want an untouched base layer at the bottom in case of emergency, even if it doesn't contribute to the end result), layer masked Shen Wei into isolation on the working layer, and placed beneath him a layer. In way of experiment, I filled with #9cb7bc. Because I refused to believe that the icon might be done, I then putzed about trying to add text onto it – I thought "If you cut me, do I not bleed?" would fit Shen Wei's expression – but returned to the minimalistic, two-layers-only icon. The text version is available to those who may wish to use it.


Episode 6 was the one with the girl who cast no shadow, and I wanted a more team interaction shot, so I took this one where Zhao Yunlan steps on Da Qing's foot. My original intent was to make the background all the same color as the bright floor, but that didn't work, so I faffed about with gradient map layers and fog. Not entirely happy with how this one turned out.


I saw them lean close to each other, so I took the screencap! (Episode 7, Zhao Yunlan saves Shen Wei from some thugs.) My original intent was to make it all artsy, with Shen Wei in grayscale and Zhao Yunlan/the rest of the world vivid in a visual metaphor on how Shen Wei is different to the Haixingren. Alas, that didn't work at all, so I went >:( and abandoned it for a while. Then, I discovered textures, and found these opal textures also byalwaysbeenasmiler. I grabbed one, used it luminosity-masked for lights to give Zhao Yunlan and Shen Wei some sparkle, and put another as the background. Suddenly, I had an icon!


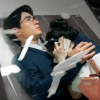
My grayscale Shen Wei didn't work above, but in episode 8, I got it to work! The cap's from Shen Wei discovering Zhao Yunlan on the curbside, and I got a good crop where some of Zhao Yunlan's head was visible along with Shen Wei's face. I upped the chroma on everything, redid the chroma-upping on a "Zhao Yunlan's head" layer, added a desaturated Shen Wei layer, then slapped on some text that I felt suited Shen Wei's colossal pining towards Zhao Yunlan. (Inexplicably, I keep humming it to the tune of that one bit of What Doesn't Kill You Makes You Stronger – You know I dream in color / Sleeping here alone – which is a damn break-up song, but brains are weird I guess.)


Episode 9 had a nice shot of Zhao Yunlan gesticulating, so I went with that one! I actually made this one last, so I looked at the big picture and decided I was missing a green icon. I originally had Zhao Yunlan in a terrible green, but that didn't work at all, so I made him yellow to go with the yellow background and orange Jeep (both done in separate layers with colorize). Then I went on a texture downloading binge to see if I could make it more interesting;jordannamorgan's Ajisai texture set had a texture with scribbly text on it, so I had to try that one out immediately. After a few layer mode choices, it was perfect! Zhao Yunlan is at the source of eldritch knowledge, utterly blasé about it. (I also like leaving some of the background visible, since unless it's The Point, I want some texture to the background, and the easiest way is to let some of the original background show through.)


I returned to the "woman is menaced by unseen thing behind her" idea for episode 10! A luminosity mask to make the lights white, some midtone and shadows color toning, and then I played around with gimp's flame tool to add the purple swirly stuff behind her. Success!
In my journey, in addition to the luminosity mask tutorial, the rest of gimp.org's photo editing tutorials should be worh a second look (esp. the B&W conversion one). Other interesting tutorials for those who wish to start into icon-making are this tutorial on making black-and-white icons, and this tutorial introduced me to doing some dodging and burning on a separate midtone gray layer set to overlay (nondestructive dodge/burning)!
I've also made other icons! I made a few for my own needs:

I had to do a whole bunch of weird shit for the Zhao Yunlan icon to make the background (with its edges and contrasts and color pops) be less in-your-face. For one, there's a layer that looks like this:

...yeah.
The Ye Zun was much simpler – I only had to edit out a distracting window from the bottom corner – and for the Shen Wei and Li Qian one, I did a bit more involved thing involving all the background desaturated, then a contrast-amped layer set to soft light above that to bring it from grayscale to pseudograys and make it look nicer. (Soft light and overlay are my favorite layer modes, currently.)
And I spotted a chiaroscuro challenge at icontalking, so I had to participate:


Ye Zun didn't quite turn out as chiaroscuro as I'd hoped, but oh well. With him and Shen Wei, I tested out layer decomposition – Shen Wei is RGB green channel, while Ye Zun's face is plain desaturate and the rest of him is RGB red. Save for the yutoudao, they're all done using a 50% gray (#808080) overlay layer on which I dodged highlights into white and burned shadows into the darkness. The yutoudao, I just desaturated and played with levels (with the yutoudao on its own layer and the background on its own) and came up with this image, which I then put into Value layer mode atop the contrast-maximized original:

I also tried desaturating Li Qian (and then making the grays cooler with an overlay layer of Thus Spake Ye Zun), but it didn't really work as well as I'd hoped:

Icon challenge
1-5
6-10
Chiaroscuro
1-5
Alts & misc
alt 1-4
misc 1-3
I gave in to my urge to tl;dr about what I did; if you just want the pretty pictures, click here.
Note that all my prior-to-this icons were just screencaps that were edited with brightness-contrast etc if necessary (or perhaps a logo/subtitling/inauspicious sleeves or windows meticulously removed), with the end goal being something that looked exactly like a screencap. Now, however, I took the plunge of being Creative with icons, and armed with the luminosity mask tutorial and prior experience with layer masks (ah, my misspent youth making terrible graphics for online horse breeding simulators, you finally become useful), I set to work.
For episode 1, I knew exactly what cap I wanted to use, and how I wanted to use it, so I went and played with luminosity masked layers until I got the desired result. (One of the nice bits of luminosity masks is that I could just take the one that let shadows through and fill it with back to get the dramatic shadows I wanted.) Then I added the text 黑袍教授 ("Professor Black Robe") onto it, because this is the first time Shen Wei goes Envoy in Professor clothes. Of note is that I had to basically quadruple the 黑袍 textlayer to make it stand out with the same intensity as the 教授 text layer.
Once I was done being all dramatic for ep 1, I went to episode 2 and did something much less dramatic. I did some layer duplication and layer masking so that I had fully-colored Shen Wei and Zhao Yunlan on their own layer, and then a desaturated everything else. The greys were too warm-looking, so I added some #9cb7bc with an Overlay layer (IIRC) at low opacity to make it cooler. #9cb7bc is my favorite image editing color. It's so useful! (It's also the color of the text in the Thus Spake Ye Zun collection!)
Episode 3, I saw this cap of mine and wanted to make a "woman is menaced by unseen thing behind her" icon. I played with the color levels etc, and added some texture behind her with GIMP's native tools (fog, lava), and ended up with a bleh icon that was completely different to what I wanted to do. I later came across
For episode 4's icon, a post by
I was going through my episode 5 caps when I noticed I had one of Shen Wei taking off his glasses, so I decided to pander to
Episode 6 was the one with the girl who cast no shadow, and I wanted a more team interaction shot, so I took this one where Zhao Yunlan steps on Da Qing's foot. My original intent was to make the background all the same color as the bright floor, but that didn't work, so I faffed about with gradient map layers and fog. Not entirely happy with how this one turned out.
I saw them lean close to each other, so I took the screencap! (Episode 7, Zhao Yunlan saves Shen Wei from some thugs.) My original intent was to make it all artsy, with Shen Wei in grayscale and Zhao Yunlan/the rest of the world vivid in a visual metaphor on how Shen Wei is different to the Haixingren. Alas, that didn't work at all, so I went >:( and abandoned it for a while. Then, I discovered textures, and found these opal textures also by
My grayscale Shen Wei didn't work above, but in episode 8, I got it to work! The cap's from Shen Wei discovering Zhao Yunlan on the curbside, and I got a good crop where some of Zhao Yunlan's head was visible along with Shen Wei's face. I upped the chroma on everything, redid the chroma-upping on a "Zhao Yunlan's head" layer, added a desaturated Shen Wei layer, then slapped on some text that I felt suited Shen Wei's colossal pining towards Zhao Yunlan. (Inexplicably, I keep humming it to the tune of that one bit of What Doesn't Kill You Makes You Stronger – You know I dream in color / Sleeping here alone – which is a damn break-up song, but brains are weird I guess.)
Episode 9 had a nice shot of Zhao Yunlan gesticulating, so I went with that one! I actually made this one last, so I looked at the big picture and decided I was missing a green icon. I originally had Zhao Yunlan in a terrible green, but that didn't work at all, so I made him yellow to go with the yellow background and orange Jeep (both done in separate layers with colorize). Then I went on a texture downloading binge to see if I could make it more interesting;
I returned to the "woman is menaced by unseen thing behind her" idea for episode 10! A luminosity mask to make the lights white, some midtone and shadows color toning, and then I played around with gimp's flame tool to add the purple swirly stuff behind her. Success!
In my journey, in addition to the luminosity mask tutorial, the rest of gimp.org's photo editing tutorials should be worh a second look (esp. the B&W conversion one). Other interesting tutorials for those who wish to start into icon-making are this tutorial on making black-and-white icons, and this tutorial introduced me to doing some dodging and burning on a separate midtone gray layer set to overlay (nondestructive dodge/burning)!
I've also made other icons! I made a few for my own needs:
I had to do a whole bunch of weird shit for the Zhao Yunlan icon to make the background (with its edges and contrasts and color pops) be less in-your-face. For one, there's a layer that looks like this:
...yeah.
The Ye Zun was much simpler – I only had to edit out a distracting window from the bottom corner – and for the Shen Wei and Li Qian one, I did a bit more involved thing involving all the background desaturated, then a contrast-amped layer set to soft light above that to bring it from grayscale to pseudograys and make it look nicer. (Soft light and overlay are my favorite layer modes, currently.)
And I spotted a chiaroscuro challenge at icontalking, so I had to participate:
Ye Zun didn't quite turn out as chiaroscuro as I'd hoped, but oh well. With him and Shen Wei, I tested out layer decomposition – Shen Wei is RGB green channel, while Ye Zun's face is plain desaturate and the rest of him is RGB red. Save for the yutoudao, they're all done using a 50% gray (#808080) overlay layer on which I dodged highlights into white and burned shadows into the darkness. The yutoudao, I just desaturated and played with levels (with the yutoudao on its own layer and the background on its own) and came up with this image, which I then put into Value layer mode atop the contrast-maximized original:
I also tried desaturating Li Qian (and then making the grays cooler with an overlay layer of Thus Spake Ye Zun), but it didn't really work as well as I'd hoped:
All the icons, no blather
Icon challenge
1-5 6-10Chiaroscuro
1-5Alts & misc
alt 1-4
no subject
Date: 2019-03-08 12:57 (UTC)#1, I had a Vision and I sure did hit it! I loved Shen Wei's "My postgrad, no touch" expression and of course had to iconize it.